1600 Conference
Room AV
Playing Video
TO
PLAY VHS:
- Make sure the machines
(including the TV) are all turned on
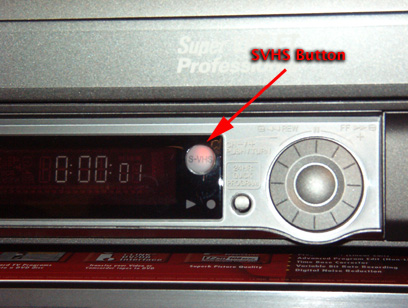
- Press the SVHS button
just below the place you insert the VHS tape -- this will enable the VHS portion
of the player
- Insert VHS tape and play
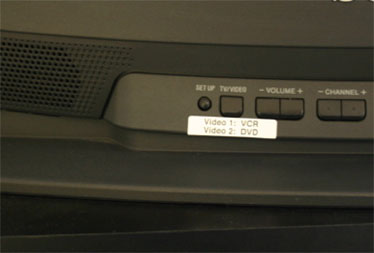
NOTE: If the video does not play after you've followed the steps above, check to make sure the TV input is set to VIDEO 1. You can toggle between different inputs by pressing the TV/VIDEO button below the TV screen.
TO
PLAY MINIDV:
- Make sure the machines
(including the TV) are all turned on
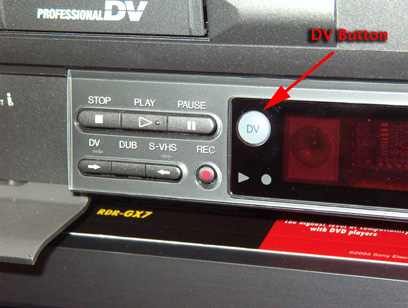
- Press the DV button just
below the place you insert the miniDV tape -- this will enable the miniDV
portion of the player
- Insert miniDV tape and
play
NOTE: If the video does not play after you've followed the steps above, check to make sure the TV input is set to VIDEO 1. You can toggle between different inputs by pressing the TV/VIDEO button below the TV screen.
TO
PLAY DVD:
- Make sure the machines
(including the TV) are all turned on
- Put the DVD disk into
the player and play (there is a little bit of a wait for it to load the video
but you should see the time counter start changing on the DVD player once
it has begun to play)
NOTE: If the video does not play after you've followed the steps above, check to make sure the TV input is set to VIDEO 2. You can toggle between different inputs by pressing the TV/VIDEO button below the TV screen.
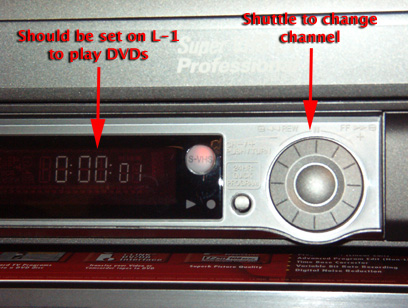
If the image and sound
still don't come through on the TV, try changing the channel on the z/miniDV
player (top machine) by turning the shuttle: It should be set
on the "L-1" channel. The shuttle is found just below the place
where you insert VHS tapes
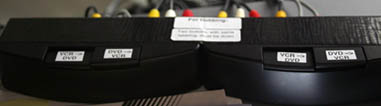
Also, make sure that both VCR-->DVD buttons are depressed on the switcher
Dubbing
Video
(i.e. duplicating and transferring video to other formats)
TO
DUB FROM VHS TO MiniDV
TO
DUB FROM VHS TO DVD
TO
DUB FROM MINIDV TO VHS
TO
DUB FROM MINIDV TO MINIDV
TO
DUB FROM MINIDV TO DVD
TO
DUB FROM DVD TO VHS
- Make sure the machines
(including the TV) are all turned on
- Follow the directions
for playing a DVD; queue the DVD to the place you want to begin recording
- Do step (2) of the directions
for playing a VHS and insert a blank tape
- When you are ready, press
the red “Rec” button on the JVC VHS/miniDV player to begin recording
on the VHS –

– and
the “Play” button on the Sony DVD player to begin playing the
DVD

TO
DUB FROM DVD TO DVD
The best way to duplicated
a DVD without copy protection (i.e. the videos we make ourselves) is to use
a software called Roxio Toast Titanium at one of the computer stations in 1600SEB.
Look for this icon in the dock –
- Insert the DVD you would
like to copy into the disk drive
NOTE: The "eject" button for the CD/DVD drive
can be found on computer keyboard, in the upper-right corner. 
- Select the "Copy"
tab in Toast
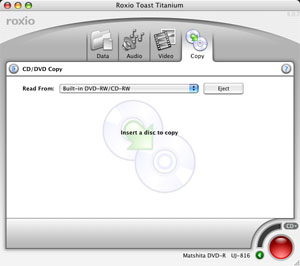
- Click on the red button
in the bottom right corner and follow the on screen instructions.
TO
DUB FROM iMOVIE TO DVD AND MINIDV
- Make sure the video decks
and the TV are turned on
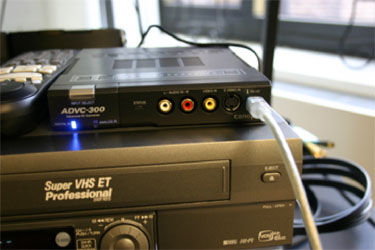
- Turn on the Canopus
D/A converter (the "on/off" button is found on the back of the device)
- Make sure the Canopus
D/A coonverter is set to "Digital In"
NOTE: The silver button, over the blue light, toggles the
signal input between digital input and analog input
- Plug in firewire a 4-6
pin cable into front port
- Plug an RCA cable (yellow,
red, and white plugs) into the (yellow, red. and white) back ports
- Plug the
other end of the RCA cables to the front ports of the Sony DVD recorder
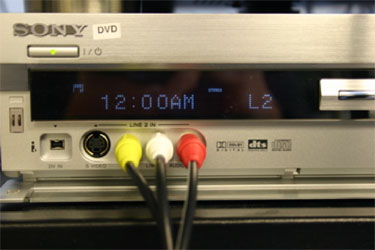
- Set the
input of the Sony DVD Recorder to be L2
NOTE:
The input select for the DVD Recorder can be found among the buttons on the
lower-right front of the player

- Make sure
input of the JVC VCR is set to L1
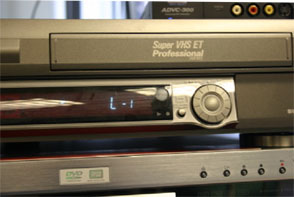
NOTE:
The circular shuttle (depicted above) allows you to change the input selection
by turning the outer ring clockwise/counter-clockwise
- Press the
“DV” button on the JVC VCR -- this will enable the miniDV portion
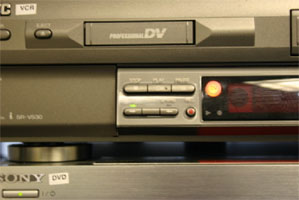
NOTE:
When the miniDV portion is active, the DV button glows orange as depicted
above
- On the signal
router device, depress the two DVD —> VCR
buttons
- Choose "Video
1" for the input on the TV.
NOTE:
To switch (and check) the TV input, press the TV/VCR button on the front of the TV. The selected input will be displayed on the TV for a few seconds. If the video input is not "Video 1," press the button again: "Video 1" should appear.
- Plug the other end of
the 4-6 firewire cable that runs from the Canopus D/A converter (i.e. from
steps 2-3, above) into the firewire port of a computer.
You should be able to play
the video from iMovie and have it appear on the TV. For more details on performing
the dub, please refer to the Video Processing Workflow.
NOTE: When you are done, please make sure to reset the input of the Sony DVD Recorder to L-1 depress both VCR-->DVD buttons on the switcher
Capturing
Video with iMovie
TO
CAPTURE FROM VHS
- Make sure the machines
(including the TV) are all turned on
- Plug in 6-pin to 4-pin
firewire cable –
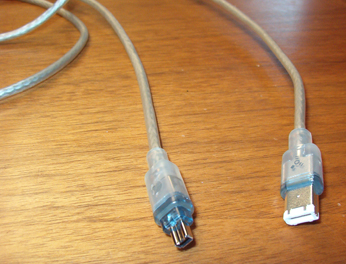
– into
the “DV in/out” port of the JVS VHS/miniDV player
- Plug the other end of
the 6-pin to 4-pin firewire cable into the firewire port of your computer
- Open iMovie and make
sure --
- iMovie preferences (found
under the iMovie menu) has the “Play video through to camera”
option checked; it should look like this:

- iMovie is set to capture
video from a camera; the setting should look like this:

NOTE: Make sure that there is no miniDV tape in the player
- Follow directions above
for playing VHS; the video should appear in the iMovie window
- Queue the VHS to the
beginning of the video you want to capture and click on the “import”
button in iMovie:

NOTE: Click on the “import” button again to stop the capturing
TO
CAPTURE FROM MINIDV
- Make sure the machines
(including the TV) are all turned on
- Plug in 6-pin to 4-pin
firewire cable –
– into
the “DV in/out” port of the JVS VHS/miniDV player
- Plug the other end of
the 6-pin to 4-pin firewire cable into the firewire port of your computer
- Open iMovie and make
sure --
- iMovie preferences (found
under the iMovie menu) has the “Play video through to camera”
option checked; it should look like this:
- iMovie is set to capture
video from a camera; the setting should look like this:
- Follow directions above
for playing miniDVs; the video should appear in the iMovie window
- Queue the miniDV to
the beginning of the video you want to capture and click on the “import”
button in iMovie:
NOTE:
Click on the “import” button again to stop the capturing
TO CAPTURE FROM DVD
- Make sure the machines
(including the TV) are all turned on
- Plug in 6-pin to 4-pin
firewire cable –
– into
the “DV in/out” port of the JVS VHS/miniDV player
- Plug the other end of
the 6-pin to 4-pin firewire cable into the firewire port of your computer
- Open iMovie and make
sure --
- iMovie preferences (found
under the iMovie menu) has the “Play video through to camera”
option checked; it should look like this:
- iMovie is set to capture
video from a camera; the setting should look like this:
NOTE: Make sure that there is no miniDV tape in the player
- Follow directions above for playing DVDs; the video should appear in the iMovie window
- Queue the DVD to the beginning of the video you want to capture and click on the “import” button in iMovie:
NOTE: Click on the “import” button again to stop the capturing
Default
Setup
This is standard configuration for the Conference Room AV Equipment. The AV operating instructions detailed on this page are based on the assumption that the equipment is set up according to this default.
EQUIPMENT NECESSARY TO COMPLETE THE SETUP
- JVC Mini DV/S-VHS VIDEO CASSETTE RECORDER
- SONY DVD Recorder
- SONY 24" Trinitron Display
- Connection Switcher
- 6 RCA Cable Connectors, two of which should be at least four feet long
From the back, the units should be arranged like this:
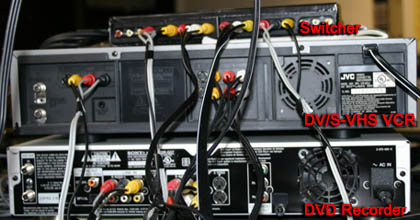
TO CONFIRM CONNECTIONS
-
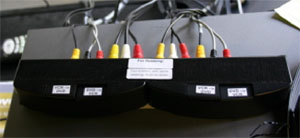
Check the back of the switcher unit to make sure that the RCA cables are connected to it properly. The four shorter RCA cables should be attached to the switcher--the two longer cables will be used to make connections with the TV display. Of the six switcher connection slots, four should have the red, white and yellow RCA cables attached--the outputs and inner inputs--while the outer slots on either side should be empty. The switcher setup should match the image below.
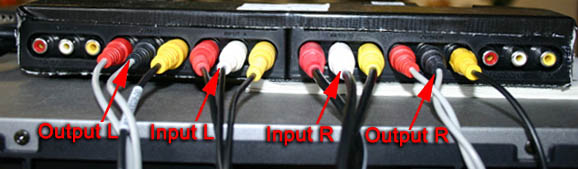
From left to right, the cables attached to the used switcher outputs and inputs will be referred to as Output L, Input L, Input R and Output R
-
Switcher Output L should be connected to the top Line In on the back of the DVD Recorder
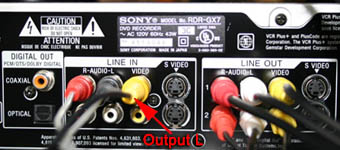
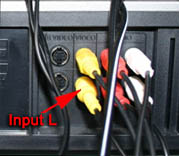
- Switcher Input L should be connected to the bottom Line Out on the back of the VCR
- Switcher Input R should be connected to the top Line Out on the back of the DVD Recorder
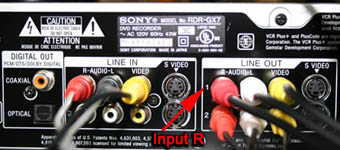
- Switcher Output R should be connected to the Line In on the back of the VCR

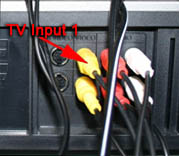
- There are two Line Inputs on the back of the TV monitor. The two longer (four feet or more) RCA cables should be used to make connections with the monitor.
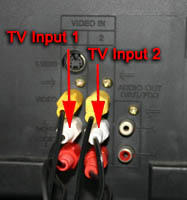
Check to make sure that Input 1 on the TV is connected to the top output on the back of the VCR
The second TV Input should be connected to the bottom output on the back of the DVD Recorder

TO CONFIRM SETTINGS
- Check to make sure that the TV display is set to VIDEO 1, receiving input from the VCR. The TV/VIDEO button below the screen on the front of the set switches its input.
- Also, check to make sure that both VCR--DVD buttons on the switcher are depressed
- The VCR should be set to play VHS tapes. Depress the SVHS button next to the time display on the front of the VCR to change its setting.
- The VCR should also be set to receive input from channel L-1. Change its input by holding down and rotating the shuttle on the front right of the VCR.
- The input on the DVD-Recorder should be set to L-1. The 'Input Select' button on the lower right front of the Recorder changes its input